
- Product Information
- Components
- Test Principal
- Sample Collection
- Reagent Preparation
- Assay Procedure
- Troubleshooting
| SKU: | EK760161 |
| Category: | Elisa Kits |
| Species: | Bovine |
| Assay Principle: | Quantitative |
| Measurement: | Sandwich |
| Target Name: | Mucin-1 |
| Sample Type: | serum , plasma , urine , tissue homogenates , cell culture supernates |
| Sensitivity: | 0.1 ng/ml |
| Standard: | 10.8 ng/ml |
| Detection Range: | 0.3 ng/ml - 8 ng/ml |
| Assay Time: | 1 - 5 h |
| Sample Volume: | 50 - 100 ul |
| Detection Wavelength: | 450 nm |
| Research Area: | Signal Transduction |
| Abbreviation: | MUC1 |
Components
| Assay plate (12 × 8 coated Microwells) | 1 |
| Standard (Lyophilized) | 1×0.5ml |
| Standard Diluent | 1×1.5ml |
| HRP-Conjugate Reagent | 1×6ml |
| Sample Diluent | 1×6ml |
| Chromogen Solution A | 1×6ml |
| Chromogen Solution B | 1×6ml |
| Stop Solution | 1×6ml |
| Wash Solution | 1×20ml×30 fold |
| User manual | 1 |
| Adhesive Strip | 1 |
Test Principle
This ELISA kit uses quantitative-ELISA as the method. The Micro-elisa strip plate provided in this kit has been pre-coated with an antibody specific to Mucin-1. Standards or samples are added to the appropriate Micro-elisa strip plate wells and combined to the specific antibody. Then a Horseradish Peroxidase (HRP)-conjugated antibody specific for Mucin-1 is added to each Micro-elisa strip plate well and incubated. Free components are washed away. The TMB substrate solution is added to each well. Only those wells that contain Mucin-1 and HRP conjugated Mucin-1 antibody will appear blue in color and then turn yellow after the addition of the stop solution. The optical density (OD) is measured spectrophotometrically at a wavelength of 450 nm. The OD value is proportional to the concentration of Mucin-1. You can calculate the concentration of Mucin-1 in the samples by comparing the OD of the samples to the standard curve.
Sample Collection
Serum - Use a serum separator tube and allow samples to clot for two hours at room temperature or overnight at 4oC before centrifugation for 20 minutes at approximately 1,000×g. Assay freshly prepared serum immediately or store samples in aliquot at -20oC or -80oC for later use. Avoid repeated freeze/thaw cycles.
Plasma - Collect plasma using EDTA or heparin as an anticoagulant. Centrifuge samples for 15 minutes at 1,000×g at 2-8oC within 30 minutes of collection. Remove plasma and assay immediately or store samples in aliquot at -20oC or -80oC for later use. Avoid repeated freeze/thaw cycles.
Tissue homogenates - The preparation of tissue homogenates will vary depending upon tissue type.
- Tissues were rinsed in ice-cold PBS to remove excess blood thoroughly and weighed before homogenization.
- Minced the tissues to small pieces and homogenized them in fresh lysis buffer (Different lysis buffer needs to be chosen based on subcellular location of the target protein) (w:v = 1:20-1:50, e.g. 1mL lysis buffer is added in 20-50mg tissue sample) with a glass homogenizer on ice (Micro Tissue Grinders woks, too).
- The resulting suspension was sonicated with an ultrasonic cell disrupter till the solution is clarified.
- Then, the homogenates were centrifuged for 5 minutes at 10,000×g. Collect the supernates and assay immediately or aliquot and store at ≤-20°C.
Cell Lysates - Cells need to be lysed before assaying according to the following directions.
- Adherent cells should be washed by cold PBS gently, and then detached with trypsin, and collected by centrifugation at 1,000×g for 5 minutes (suspension cells can be collected by centrifugation directly).
- Wash cells three times in cold PBS
- Resuspend cells in fresh lysis buffer with concentration of 107 cells/mL. If it is necessary, the cells could be subjected to ultrasonication till the solution is clarified.
- Centrifuge at 1,500×g for 10 minutes at 2-8°C to remove cellular debris. Assay immediately or aliquot and store at $le -20°C.
Urine - Collect the first urine of the day (mid-stream) and discharge it directly into a sterile container. Centrifuge to remove particulate matter, assay immediately or aliquot and store at ≤ -20°C. Avoid repeated freeze-thaw cycles.
Saliva - Collect saliva using a collection device or equivalent. Centrifuge samples at 1000 × g at 2-8°Cfor15 minutes. Remove particulates and assay immediately or store samples in aliquot at ≤ -20°C. Avoid repeated freeze-thaw cycles.
Feces - Dry feces were collected as much as possible, weighing more than 50 mg. The feces were washed three times with PBS (w:v = 1:9, e.g. 900 µL lysis buffer is added in 100 mg feces), sonicated(or mashed)and centrifuged at 5000×g for 10 minutes, where the supernatant was collected for testing.
Cell culture supernates and other biological fluids - Centrifuge samples for 20 minutes at 1,000×g. Collect the supernates and assay immediately or store samples in aliquot at -20°C or -80°C for later use. Avoid repeated freeze/thaw cycles.
Note
- Samples to be used within 5 days may be stored at 4°C, otherwise samples must be stored at -20°C (≤1 month) or -80°C (≤2 months) to avoid loss of bioactivity and contamination.
- Sample hemolysis will influence the result, so hemolytic specimen should not be used.
- When performing the assay, bring samples to room temperature.
- It is highly recommended to use serum instead of plasma for the detection based on quantity of our in-house data.
Reagent Preparation
- Prepare wash buffer
- Combine 20 ml concentrated wash buffer (whole bottle) with 580 ml DI water
- Standard Dilute the standard pipette 50 ul standard diluent in each tube. Pipette 100 ul standard in the fifth tube. And take out 100 ul from the fifth five tube into the fourth. Pipette 50 ul from the fourth tube to the third tube and produce dilution series as below. The undiluted Standard serves as the high standard. Sample Diluent serves as the zero standard blank well.
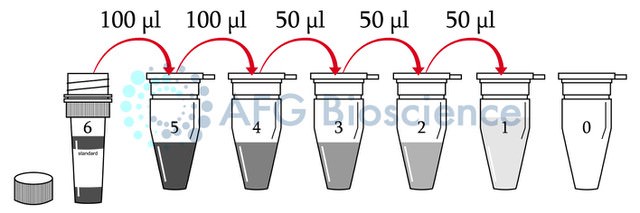
| Tube | 6 | 5 | 4 | 3 | 2 | 1 | 0 |
| µmol/L | 10.8 | 7.2 | 4.8 | 2.4 | 1.2 | 0.6 | 0 |
Assay Procedure
- Prepare standards
- Pipette 100 ul standard diluent into new microcentrifuge tubes (labeled 5-0)
- Pipette 200 ul of standard into tube 5, vortex
- Transfer 200 ul of tube 5 into tube 4,
- Transfer 100 ul of tube 4 into tube 3 vortex repeat process to tube 1
- Tube 0 will only be sample diluent
- Add 50 ul of standards in duplicate to provided 96-well plate
- Using a multichannel pipette, add 40 ul of sample diluent to all wells that will contain samples (NOT WELLS CONTAINING STANDARD)
- Add 10 ul samples to wells in duplicate
- Cover and incubate at 37°C for 40 minutes
- Wash plate 5 times
- Adding 300 ul wash solution/wash
- Add 50 ul of HRP to all wells EXCEPT blank (standard tube 0)
- Cover and incubate at 37°C for 40 minutes
- Wash plate 5 times
- Adding 300 ul wash solution/wash
- Add 50 ul of Chromogen A to all wells followed by 50 ul of Chromogen B
- Avoid light while preforming this step
- Cover and incubate at 37°C for 20 minutes
- Add 50 ul of Stop solution to each well
- Read immediately at 450 nm
- When analyzing the plate, subtract the reading of the blank well from all other absorbances
- Additionally, a 5-fold dilution was done when samples were initially diluted so multiply concentration by 5 to get real concentration.
Troubleshoot Common Elisa Issues
- Use the correct pipette that is within the range suggested by manufacturer
- Confirm tip is firmly seated on the pipette
- Confirm there are no air bubbles while pipetting
- Change tips between each standard, sample, or reagent
- Use different reservoirs for each reagent
- Pipette sample into the side of wells to avoid splashing
- Always run samples/standards in replicate
- Completely aspirate liquid from all wells by gently lowering an aspiration tip into the bottom of each well.
Note: Take care not to scratch the inside of the well. - Fill the wells with at least 500 µL of diluted wash buffer
- Let soak for 25 to 30 seconds
- Aspirate wash buffer from wells
- Repeat as directed in protocol (usually 4-5 times)
- After washing is complete, invert plate and tap (forcefully, if necessary) dry on absorbent tissue. Be sure to remove any residual liquid.
- Alternatively, a squirt bottle or automated plate washer may be used. Be sure to follow the above.
| Possible Cause | Solution |
|---|---|
| Mixed use of component reagents | Please read labels clearly when preparing or using |
| In the process of plate washing and sample addition, the enzyme marker is contaminated and inactivated, and loses its ability to catalyze the color developing agent | Confirm that the container holding the ELISA plate does not contain enzyme inhibitors (such as NaN3, etc.), and confirm that the container for preparing the Wash Solution has been washed. |
| Missing a reagent or a step | Review the manual in detail and strictly follow the operating steps. |
| Possible Cause | Solution |
|---|---|
| The sample uses NaN3 preservative, which inhibits the reaction of the enzyme | Samples cannot use NaN3 |
| The sample to be tested may not contain strong positive samples, so the result may be normal | In case of doubt, please test again. |
| Wrong filter used for absorbance reading | When TMB is used as the substrate, the absorbance should be read at 450 nm. |
| Insufficient incubation time | Make sure to follow recommended incubation times. |
| Insufficient color reaction | Usually 15 - 30 minutes |
| The number of washings increases, and the dilution ratio of the concentrated lotion does not meet the requirements | Reduce the impact of washing, dilute the concentrated lotion and washing time according to the manual, and accurately record the washing times and dosage. |
| Distilled water quality problem | The prepared lotion must be tested to see if the pH value is neutral. |
| In the process of plate washing and sample addition, the enzyme marker is contaminated and inactivated, and loses its ability to catalyze the color developing agent. | Confirm that the container holding the ELISA plate does not contain enzyme inhibitors (such as NaN3, etc.), confirm that the container for preparing the Washing Solution has been washed, and confirm that the purified water for preparing the Washing Solution meets the requirements and is not contaminated. |
| The kit has expired or been improperly stored | Please use it within the expiration and store it in accordance with the storage conditions recommended in the manual to avoid contamination. |
| Reagents and samples are not equilibrated before use | All reagents and samples should be equilibrated at room temperature for about 30 minutes. |
| Insufficient suction volume of the pipette, too fast discharge of pipetting suction, too much liquid hanging on the inner wall of the tip or the inner wall is not clean. | To calibrate the pipette, the tips should be matched, each time the tips should fit tightly, the pipetting should not be too fast, and the discharge should be complete. The inner wall of the tips should be clean, and it is best to use it once. |
| Incubation temperature constant temperature effect is not good | Keep the temperature constant to avoid the local temperature being too high or too low |
| When adding liquid, too much remains on the medial wall of wells | When adding liquid, the tip should try to add liquid along the bottom of the medial wall of wells without touching the bottom of the hole. |
| Reuse of consumables | The tips should be replaced when different reagents are drawn, and different storage vessels should be used when configuring different reagent components. |
| The bottom of the microwell is scratched or there is dirt | During incubations, cover assay plates with plate sealers. Use a fresh sealer each time the plate is opened. This will prevent wells from contaminating each other. |
| Cross-contamination during sample addition | Try to avoid cross-contamination when adding samples |
| Cross-contamination from manual plate washing | When washing the plates by hand, the first 3 injections of the lotion should be discarded immediately, and the soaking time should be set for the next few times to reduce cross-contamination. |
| Cross-contamination when clapping | Use a suitable absorbent paper towel when clapping the plate, do not pat irrelevant substances into the well of the plate, and try not to pat in the same position to avoid cross-contamination. |
| The liquid filling head of the plate washer is blocked, resulting in unsatisfactory liquid addition or large residual amount of liquid suction, resulting in the color of plate is chaotic and irregular. | Unblock the liquid addition head, so that each well is filled with washing liquid when washing the plate and the residual amount should be small when aspirating liquid. |
| Incomplete centrifugation of the sample, resulting in coagulation in the reaction well or interference of sediment or residual cellular components | Serum plasma should be fully centrifuged at 3000 rpm for more than 6 minutes |
| The sample is stored for too long time, resulting in contamination. | Samples should be kept fresh or stored at low temperature to prevent contamination |
| Incorrect preparation of Washing Solution or direct misuse of concentrated Washing Solution | Please configure according to the manual |
| Possible Cause | Solution |
|---|---|
| Reagents not at room temperature at start of assay | It is recommended that all reagents be at room temperature before starting the assay. Allow reagents to sit on bench for 15–20 minutes to reach room temperature. |
| Incorrect storage of components | Double check storage conditions on kit label. Most kits need to be stored at 2–8oC. |
| Expired reagents | Confirm expiration dates on all reagents. Do not use reagents that are past the expiration date. |
| Reagents added/prepared incorrectly | Check protocol, ensure reagents were added in the proper order and prepared to correct dilution. |
| Incorrect dilutions prepared | Check pipetting technique—see below—and double check calculations. |
| Capture antibody didn’t bind to plate | If using a ready-to-use kit: Manufactured kits come with plates pre-coated with capture antibody. |
| If coating your own plate with an Antibody Pair Kit: Ensure that you are using an ELISA plate, not a tissue culture plate. Dilute antibody in PBS. Ensure correct preparation and incubation time for both coating and blocking steps. | |
| Wells scratched with pipette or washing tips | Use caution when dispensing and aspirating into and out of wells. Automated plate washers may need to be calibrated so tips don’t touch bottom of wells. |
| Plate read at incorrect wavelength | Make sure to use recommended wavelength/filter. |
| Possible Cause | Solution |
|---|---|
| Insufficient washing | Use appropriate washing procedure—see below. At the end of each washing step, invert plate on absorbent tissue and allow to completely drain, tapping forcefully if necessary to remove any residual fluid. |
| Plate sealers not used or reused | During incubations, cover assay plates with plate sealers. Use a fresh sealer each time the plate is opened. This will prevent wells from contaminating each other. |
| Incorrect dilutions prepared | Check pipetting technique—see below—and double-check calculations. |
| Longer incubation times thanrecommended | Make sure to follow recommended incubation times. |
| Possible Cause | Solution |
|---|---|
| Insufficient washing | Use appropriate washing procedure—see below. Increasing duration of soak steps may also help. Add 30 seconds each time you let wash buffer soak. At the end of each washing step, invert plate on absorbent tissue and allow to completely drain, tapping forcefully if necessary to remove any residual fluid. |
| Substrateexposed to light prior to use | Ensure substrate isnot exposed to light—store in a dark place. Limit exposure to light whilerunning assay. |
| The yellowingof the whole plate may be caused by wrong addition of other reagents | Check the componentsand lot numbers of the reagents before the experiment, and confirm that allcomponents belong to the corresponding kit. Reagents from differentkits or different lot numbers cannot be mixed. |
| Streptavidin-HRP contaminates the tip and TMB container orpositive control contaminates the Pre-coated Microplate | When absorbingdifferent reagents, the tips should be replaced. When configuring differentreagent components, different storage vessels should be used. Please use apipette during operation. |
| BiotinylatedAntibody or Streptavidin-HRP concentration too high | Checkwhether the concentration calculation is correct or use after furtherdilution. |
| Color development time is too long | Pleasestrictly follow the steps of the manual. |
| Longerincubation times than recommended | Make sure to followrecommended incubation times. |
| Incorrectstandard curve dilutions prepared | Check pipettingtechnique—see below—and double-check calculations. |
| The wrongfilter was used when the absorbance value was read | When TMB is used asthe substrate, the absorbance should be read at 450 nm. |
| Possible Cause | Solution |
|---|---|
| Incorrect standard curve dilutions prepared | Check pipetting technique—see below—and double-check calculations. |
| Capture antibody didn’t bind to plate | Ensure that you are using an ELISA plate, not a tissue culture plate. Dilute antibody in PBS. Ensure correct preparation and incubation time for both coating and blocking steps. |
| Possible Cause | Solution |
|---|---|
| Insufficient washing | Use appropriate washing procedure—see below. Increasing duration of soak steps may also help. Add 30 seconds each time you let wash buffer soak. At the end of each washing step, invert plate on absorbent tissue and allow to completely drain, tapping forcefully if necessary to remove any residual fluid. |
| Capture antibody didn’t bind to plate | Ensure that you are using an ELISA plate, not a tissue culture plate. Dilute antibody in PBS. Ensure correct preparation and incubation time for both coating and blocking steps. |
| Plate sealers not used or reused | During incubations, cover assay plates with plate sealers. Use a fresh sealer each time the plate is opened. This will prevent wells from contaminating each other. |
| Possible Cause | Solution |
|---|---|
| Insufficient washing | Use appropriate washing procedure—see below. At the end of each washing step, invert plate on absorbent tissue and allow to completely drain, tapping forcefully if necessary to remove any residual fluid. |
| Inconsistent incubation temperature | Manufactured kits have optimized protocols. Make sure to follow recommended incubation temperatures. Be aware of fluctuations in temperature due to environmental conditions. |
| Plate sealers not used or reused | During incubations, cover assay plates with plate sealers. Use a fresh sealer each time the plate is opened. This will prevent wells from contaminating each other. |
| Incorrect dilutions prepared | Check pipetting technique—see below—and double-check calculations. |
Product Information
| SKU: | EK760161 |
| Category: | Elisa Kits |
